
NOTE: If you find out that you DO have lice, we highly recommend that you DO NOT run to the store and get RID or NIX or anything that uses an insecticide as the main ingredient. Why? Number 1: They don't work. Number 2: You could be poisoning you family if you over use them (most people do.) CLICK HERE to learn more about this issue.
You’re standing in the bathroom, your child’s head tilted toward the light, squinting at something in their hair. Is it a nit? Dandruff? A piece of lint? You honestly can’t tell.
This is the experience most parents describe when they first suspect lice. Not a full-blown itching episode — sometimes there isn’t one. Not a letter from school — sometimes the child seems completely fine. Just that nagging feeling that something is there, and no reliable way to know for certain.
This guide covers exactly how to check for lice at home: what lice and nits actually look like, where on the scalp to find them, and which tools make the difference between guessing and knowing. The same tools professional lice inspectors use are available for home use — and once you have them, a complete inspection takes about five minutes.
Head lice (Pediculus humanus capitis) have two forms you are looking for during an inspection: the adult louse and the egg (nit). Each has distinct characteristics that distinguish it from dandruff, hair product residue, and other common debris.
Adult lice are 2–3mm long — roughly the size of a sesame seed. They are brownish-gray when unfed and darken after a blood meal. They have six legs ending in claw-like tips specifically adapted to grip the hair shaft, which is why they do not simply fall out of hair. They are fast movers — capable of traveling up to 23 centimeters per minute — which is why catching a live adult louse during inspection is difficult. You are more likely to find eggs.

Nymphs (juvenile lice) are smaller versions of the adult, 1–2mm, and lighter in color. They are easy to overlook.
Nits (lice eggs) are the most reliably found evidence of infestation and the primary target of any inspection. They are oval-shaped, approximately 0.8mm, and cemented directly to the hair shaft — not to the scalp — typically within one-quarter inch of the scalp surface. Viable nits are tan or brownish. Hatched, empty nit casings are white or clear and may be found further from the scalp as hair grows out.

The single most reliable field test: touch the suspect particle. If it moves or falls away easily, it is almost certainly dandruff, dry skin, or hair product buildup. If it is firmly stuck to the hair shaft and requires deliberate effort to slide down and off — it is a nit.
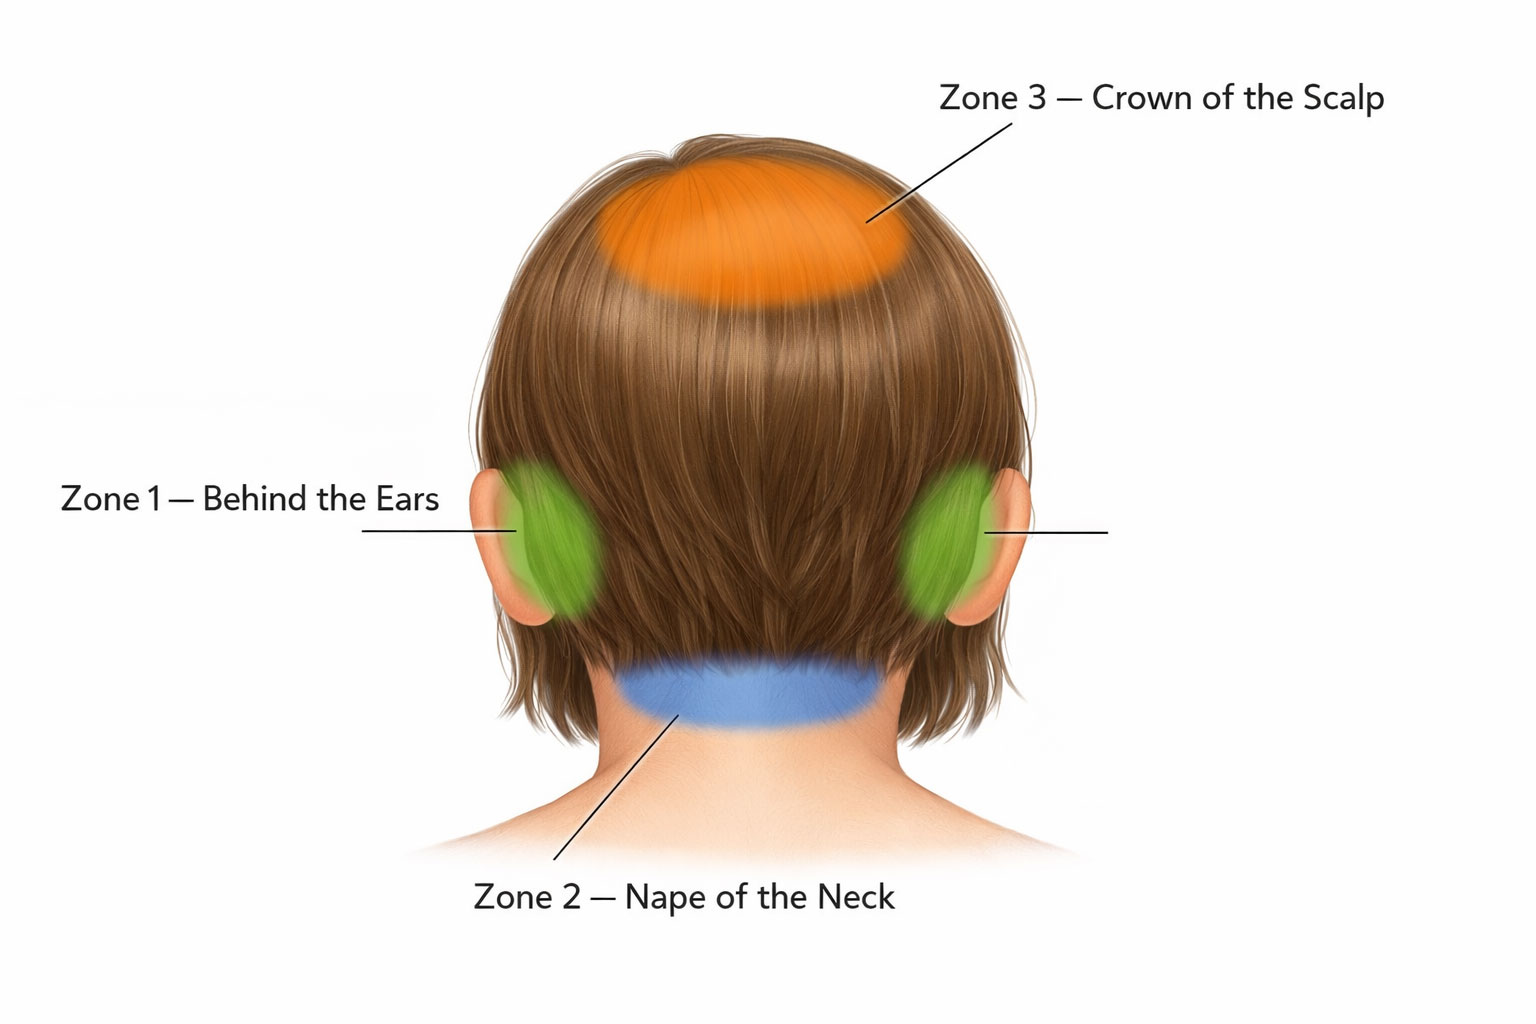
Lice do not distribute evenly across the scalp. They are attracted to warmth, darkness, and proximity to blood vessels. This makes them highly predictable in location, especially early in an infestation before the population has spread.
Zone 1 — Behind the ears. The warm, sheltered skin behind each ear is the most consistent location for both lice and nits. Every inspection should begin here. In a light infestation, this may be the only zone where evidence is present.
Zone 2 — The nape of the neck. The hairline at the back of the neck, particularly under longer hair, is the second most common location. Nits are frequently found attached to individual hair strands just above this hairline. This area is also easiest to miss under poor lighting.
Zone 3 — The crown and top of the scalp. Less common in early infestations, but the lice population expands upward as it grows. If you have confirmed evidence in Zones 1 or 2, extend your check to the crown.
Catching an infestation in Zone 1 or 2 with only a few nits present is a fundamentally different problem than discovering a population that has spread across all three zones. Early detection — through regular inspection of the right areas — is the most significant variable in how difficult treatment will be.
Most parents attempt lice inspection under whatever overhead light is available. This is the single biggest reason early infestations go undetected for weeks, and why parents who are certain they checked thoroughly still find established infestations later.
Lice and nits are cryptically colored. Their brownish-gray tones match the hair shaft closely, and under warm incandescent or fluorescent overhead lighting, a nit attached to brown or blonde hair is nearly invisible at normal viewing distance. You would need to know exactly where to look and what you are looking for to find it by eye alone under standard conditions.
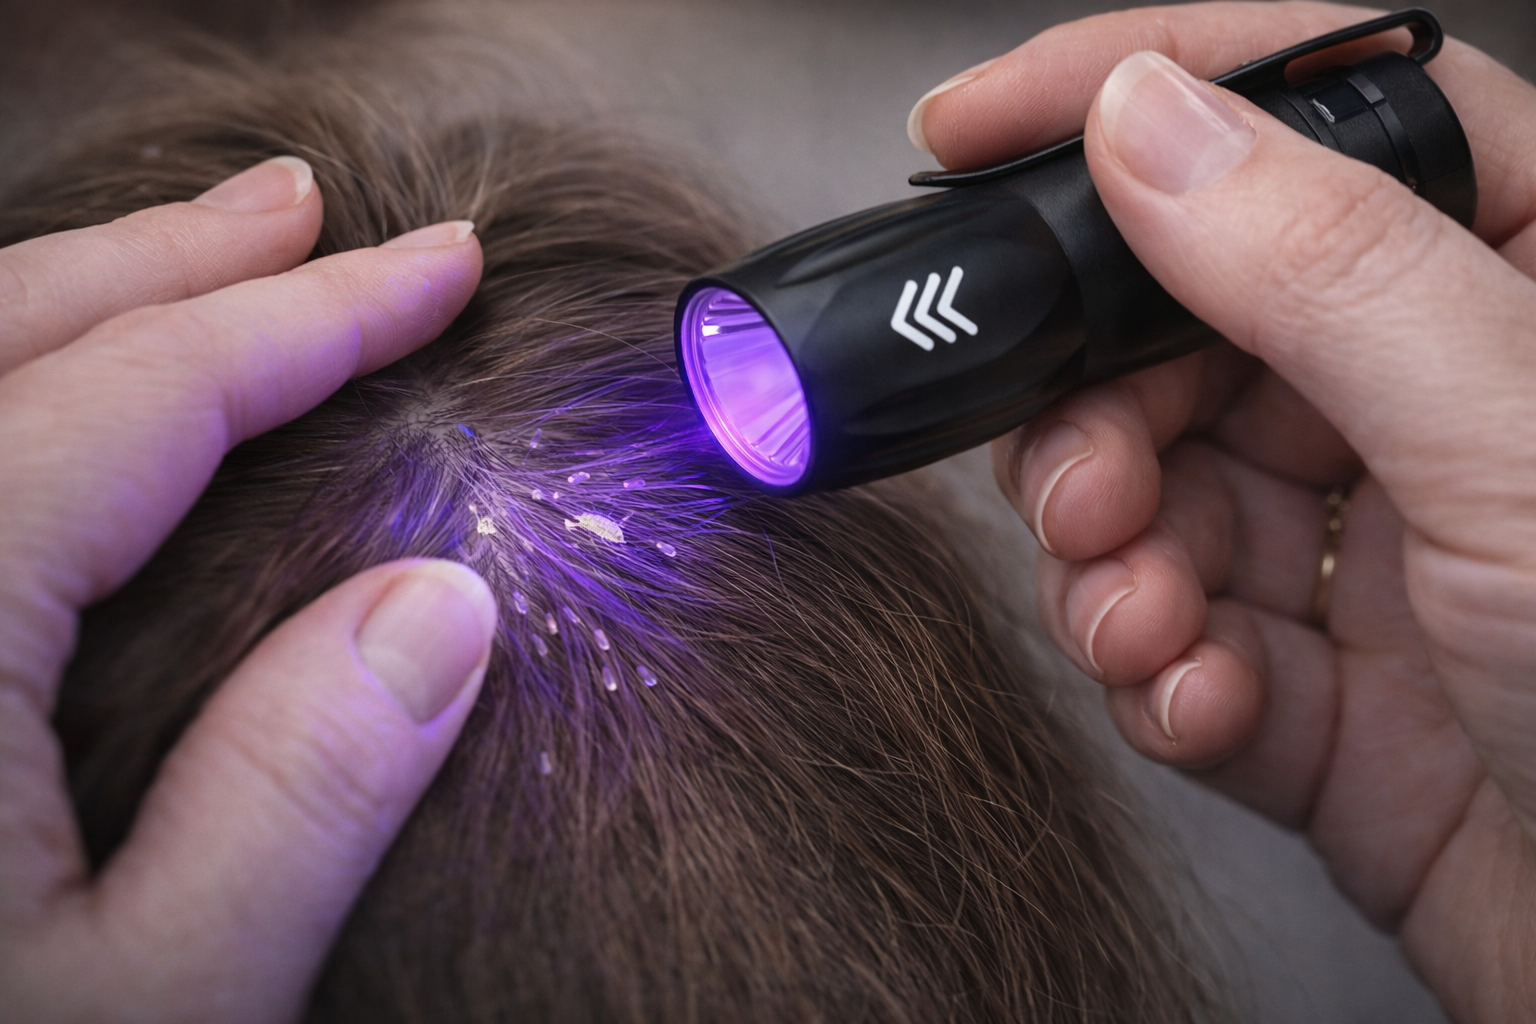
Ultraviolet (UV) light changes this completely. Nits contain compounds that fluoresce under UV wavelengths — they absorb ultraviolet light and re-emit it as visible light, producing a characteristic glow against the hair. Professional lice salons and experienced school nurses use UV black lights routinely during inspections for exactly this reason. A slow, systematic pass over the scalp converts what would take 20 minutes of squinting under overhead light into a 2-minute scan — fluorescent spots appear immediately, telling you exactly where to focus the comb.
This is not a marketing claim. It is a fundamental optical property of nit composition. The image below illustrates the effect: nits that would be nearly invisible under standard bathroom lighting become clearly visible when a UV flashlight is passed over the hair.
The following is the inspection sequence used by professional lice inspectors, adapted for home use. A complete check takes 5–10 minutes per person.
Step 1: Detangle the hair first. Spray a detangling product into the hair and work out any knots with a wide-tooth comb before touching a fine-tooth lice comb. Running a lice comb through tangled hair is painful, ineffective, and will cause the child to resist future checks. This step is not optional.
Step 2: Dim the room and use a UV light. Turn off or dim the overhead light. Slowly pass a UV black light flashlight over the scalp in sections, beginning behind the ears and at the nape of the neck. Move systematically through Zones 1, 2, and 3. Any fluorescent spots — small glowing ovals against the hair shaft — warrant closer examination. Mark or note the sections where you see fluorescence before turning the overhead light back on.
Step 3: Comb through flagged sections with a fine-tooth lice comb. Use a stainless steel fine-tooth lice comb (not a plastic comb) through the sections the UV light flagged. After each pass, examine what the comb has pulled through. A comb with a built-in magnifier allows you to identify what you are looking at without needing a separate magnifying glass.
Step 4: Confirm identification under magnification. A nit under magnification has a distinctive oval capsule shape with a small cap (the operculum) at one end. Once you have seen one confirmed nit under magnification, you will recognize them reliably in all future inspections. Live lice will be moving on the comb.
Step 5: Document what you find. Note whether you found nits, nymphs, or adult lice, and in which zones. This matters for choosing the right treatment protocol and for monitoring whether treatment is working in the days that follow.
The five-step inspection method above — detangle, UV scan, fine-comb, magnify, document — is exactly what the LiceKiller Lice Inspection Kit ($39.95) is designed around. It includes a UV black light flashlight, a fine-tooth stainless steel lice comb with built-in magnifier, a wide-tooth detangling comb, and a detangling spray formulated with lice-repelling essential oils — everything in this guide, in one kit kept under the bathroom cabinet.
Already confirmed an active infestation? The Large Everything You Need Kit includes a full treatment protocol — plus the Inspection Kit, at no extra charge.
The dandruff-versus-nit question is the most common source of confusion during home inspections. There is a definitive answer.
The attachment test is conclusive. Nits are cemented to the hair shaft with a protein-based adhesive that is chemically resistant and structurally strong. They cannot be brushed off, blown off, or removed by shaking the hair. You must physically slide them down the hair shaft to dislodge them. If a particle falls away or moves when you touch it, it is not a nit.
Additional distinguishing characteristics:
Location: Nits attach to individual hair strands within one-quarter inch of the scalp — not to the scalp surface itself. Dandruff and dry skin flakes originate from the scalp surface and distribute wherever the hair carries them, including the shoulders.
Shape and consistency: Nits are consistently oval with a smooth, uniform capsule. Dandruff flakes are irregular in shape and translucent-to-opaque white. Hair product buildup tends to have a waxy or clumped appearance.
Color: Viable nits are tan or brownish. Empty hatched casings are white or clear. Dandruff is typically white and does not have the characteristic oval shape.
UV response: Nits fluoresce under UV light. Dandruff and most common hair debris do not produce the same characteristic glow, making UV light the fastest triage tool for ambiguous findings.
Magnification: Under a magnifier, a nit has a distinctly oval capsule with a small cap at one end (the operculum, through which the nymph will hatch). This structure is not present in dandruff, debris, or hair casts. When in doubt, magnify.
During the school year, families with school-age children (ages 3–12) who have experienced a previous lice infestation should perform a routine inspection once per week. Sunday evening is a practical choice — it gives you time to respond before the school week begins if you find something.
The rationale is straightforward arithmetic. A lice infestation found at 1–3 nits requires a single, focused treatment session. The same infestation, discovered three weeks later, may involve dozens of nits at multiple life-cycle stages and will require a 10–14 day treatment protocol. Weekly inspection is not excessive caution — it is the difference between a manageable problem and a difficult one.
Increase inspection frequency to twice weekly when any of the following conditions apply:
• Your child’s school has issued a lice notification
• A classmate, teammate, or close friend has a confirmed infestation
• You are currently treating an active infestation and need to confirm the protocol is working
• Your child reports itching, a crawling sensation on the scalp, or irritability around the hairline
Note that itching is not a reliable early warning sign. The itch response is caused by an allergic reaction to lice saliva, which typically takes 4–6 weeks to develop after the initial infestation. Many children experience no symptoms at all during the early weeks, particularly with a first infestation. Waiting for symptoms before checking means waiting for a problem that is already three to six weeks old.
Adult head lice are 2–3mm long (roughly the size of a sesame seed), brownish-gray, and move quickly through the hair. Nits (lice eggs) are more commonly found during inspection: they are oval-shaped, approximately 0.8mm, tan or brownish when viable, and firmly cemented to the hair shaft within one-quarter inch of the scalp. Unlike dandruff, nits cannot be brushed off — they must be physically slid down the hair shaft to remove them. Under ultraviolet (UV) light, nits fluoresce against the hair, making them significantly easier to spot than under standard overhead lighting.
Yes — and this is common, especially early in an infestation. The itching associated with head lice is caused by an allergic reaction to lice saliva, and that reaction takes time to develop. Research indicates it can take 4–6 weeks after the initial infestation for itching to begin. Children experiencing their first infestation may have no symptoms at all during this window. By the time itching becomes noticeable, the infestation is often well established. This is why visual inspection — rather than waiting for symptoms — is the standard recommended approach for early detection.
The most reliable test is physical: nits are cemented to the hair shaft with a protein-based adhesive and cannot be brushed away or knocked off. Dandruff and dry skin flakes detach easily with a touch. Beyond the attachment test: nits are consistently oval and found within one-quarter inch of the scalp attached to individual hair strands, while dandruff is irregular in shape and originates from the scalp surface. Under UV light, nits fluoresce; dandruff does not produce the same characteristic glow. Under magnification, nits have a distinct oval capsule with a small cap (the operculum) at one end — a structure not found in dandruff or other debris.
Self-inspection is genuinely difficult because you cannot easily see the back of your own scalp. The most practical approach: in a darkened bathroom, use a UV black light flashlight while looking into a mirror, scanning the hairline at the nape of the neck and behind the ears. Then run a fine-tooth lice comb through sections of your hair and examine the comb under the UV light or a magnifier after each pass. Nits on the comb will appear as glowing oval specks under UV. If you suspect lice but cannot confirm from self-inspection alone, having another adult check Zones 1 and 2 (behind the ears and the nape of the neck) will give you a reliable answer in under five minutes.
After treating for lice, inspect daily for 10–14 days. Signs that treatment is working: no live, moving lice are visible during inspection, and no new nits appear within one-quarter inch of the scalp. Empty nit casings found further than one-quarter inch from the scalp are normal — they are remnants from before treatment and do not indicate an ongoing infestation. If new nits close to the scalp are found after treatment, this indicates either re-infestation from an outside source or an incomplete first treatment, and a second round is required. A UV flashlight and magnifying comb make the daily post-treatment monitoring check significantly faster and more reliable than naked-eye inspection alone.
Professional lice inspectors typically use three tools: a UV (black light) flashlight to make nits fluoresce against the hair shaft; a fine-tooth stainless steel lice comb to systematically section through the hair; and a magnifier to examine and confirm what the comb pulls through. Most also use a detangling spray before combing to prevent breakage and reduce discomfort, particularly for children. These same tools are available for home use. Families with a complete inspection kit can replicate the professional inspection process in approximately five minutes — making weekly routine checks practical enough to actually sustain.
With the right tools, a thorough head lice inspection takes 5–10 minutes per person. Without them — relying on bare hands and bathroom overhead lighting — the same check can take 20–30 minutes and still produce an uncertain result. The time difference comes almost entirely from the UV flashlight step: scanning systematically with UV light takes 1–2 minutes and immediately identifies which sections of hair warrant closer attention, eliminating the need to comb through the entire head section by section. Families who build a weekly inspection habit report that it becomes routine quickly and that the time investment is substantially lower than dealing with a missed and established infestation.
The LiceKiller Lice Inspection Kit ($39.95) includes every tool described in this guide: a UV black light flashlight, a fine-tooth stainless steel lice comb with built-in magnifier, a wide-tooth detangling comb, and a natural detangling spray with lice-repelling essential oils (peppermint, eucalyptus, and lavender). One kit, stored under the bathroom cabinet, makes the weekly 5-minute inspection practical enough to actually do consistently.
Already confirmed an active infestation? The Large Everything You Need Kit includes a complete enzyme-based treatment protocol — plus the Inspection Kit included at no extra charge.
1. Centers for Disease Control and Prevention. “Parasites — Lice: Head Lice Diagnosis.” U.S. Department of Health & Human Services. cdc.gov
2. Frankowski BL, Bocchini JA Jr; AAP Council on School Health and Committee on Infectious Diseases. “Head lice.” Pediatrics. 2010;126(2):392–403. doi:10.1542/peds.2010-1308
3. Ko CJ, Elston DM. “Pediculosis.” Journal of the American Academy of Dermatology. 2004;50(1):1–12. doi:10.1016/j.jaad.2003.08.026
4. Burkhart CG, Burkhart CN. “Head lice revisited.” SKINmed. 2006;5(4):169–170.
5. American Academy of Dermatology Association. “Head Lice: Signs and Symptoms.” aad.org
6. Meinking TL, Entzel P, Villar ME, et al. “Comparative efficacy of treatments for pediculosis capitis infestations.” Archives of Dermatology. 2001;137(3):287–292.
This page is provided for educational purposes only. Mothers Against Head Lice is not a medical provider. If you are uncertain about a diagnosis or your child’s symptoms, consult your pediatrician or family physician.